As a ballet dancer, I always thought when it came to alignment in yoga I would nail it, no question. I’d spent years practicing my ‘good toes, naughty toes’ and perfecting my posture in class so figured I had it down.
It wasn’t until I took my first alignment class in Shanghai did I realise that it was so much more than having decent posture and looking pretty. I felt I was taking yoga to another level once I started to understand my body a bit more and could then attempt postures and ‘feel’ the pose rather than just ‘doing’ the pose. Something I wish I had understood a little better when practising ballet – my grand jete certainly would have had more oomph that’s for sure!
Alignment was also far more challenging than I expected it to be. Classes involved holding poses for a longer period of time in order to feel and connect to the pose on a deeper level. We would use blocks, yoga straps and the wall to help align our bodies, particularly for some of the standing postures and it was eye-opening to discover that up until that point I hadn’t been opening my body as much as I could or engaging my muscles properly.
So what is alignment? Alignment alone is a collection of instructions for every pose where the body is positioned in a certain way that allows you to then experience the full benefit of the pose while avoiding injury, promoting balance and improving posture and strength. Different yoga styles have their own views on alignment so it can be a rather confusing topic. Every person’s body is different and therefore so is each person’s alignment. What can appear as a prescribed list of requirements for a pose will not work for everyone. Therefore, the aim is to guide students into a pose that they can perform to the best of their ability and ultimately reach a solid foundation as well as a deeper understanding of how their body works and whether or not the next stage of a pose is accessible. It’s all about the journey, not the destination.
For me, this is rather humbling and took me a while to accept. Flicking through thousands of pictures on Instagram getting frustrated that I couldn’t balance on one hand and press to handstand overnight. As a dancer I was always blessed with flexibility and naturally open hips seem to run in my family, but as any normal person I was annoyed that what I had in flexibility I lacked in core strength. As I started to focus more on alignment and as I discovered during my teacher training through the guidance of two wonderful teachers, I discovered that what was most important in my practice was the actual process. As long as I was paying attention to instructions and focusing on a few core concepts and the purpose of each asana, progression to the next stage was something I could decide for myself and that was a really cool experience for me. A lot like having the stabilisers on your bike taken off for the first time and then being able to go anywhere. Liberating!
When we talk about anatomy and yoga it all seems so obvious. Rather than be put off by this idea of perfection we can relax in the knowledge that what is perfect for one person may not be the same for another. By focusing on developing awareness, alignment becomes something that is far easier to understand and accomplish.
During my training, I was introduced to ‘Proprioception’. This is the body’s ability to know it’s position without actually looking. It is the perception of yourself in space and therefore a cognitive process. The proprioceptors in our muscles are sensitive to stretching and help us in yoga to develop our body awareness. Proprioception can be developed with practice. By taking the time to observe your position when performing a pose and using the breath to synchronise movement, our proprioceptive sensors are activated and this allows the body to balance itself in its environment. These simple techniques allow us to strengthen our body’s response system and results in better placement, posture and alignment.
Developing your proprioception can sometimes be super hard. I picked up a handy tip during my training which I have since found invaluable for helping my alignment and how my body feels in a particular position. Grab a Sharpie and using a decent ruler, draw a line down the centre of your mat. I know, I know, I too was initially horrified at the idea of defacing my otherwise sparkly Lululemon mat but trust me it will help. That simple line will help you when lining up your heels in standing poses, squaring your hips and placing your hands for Plank or Downward dog and so much more.
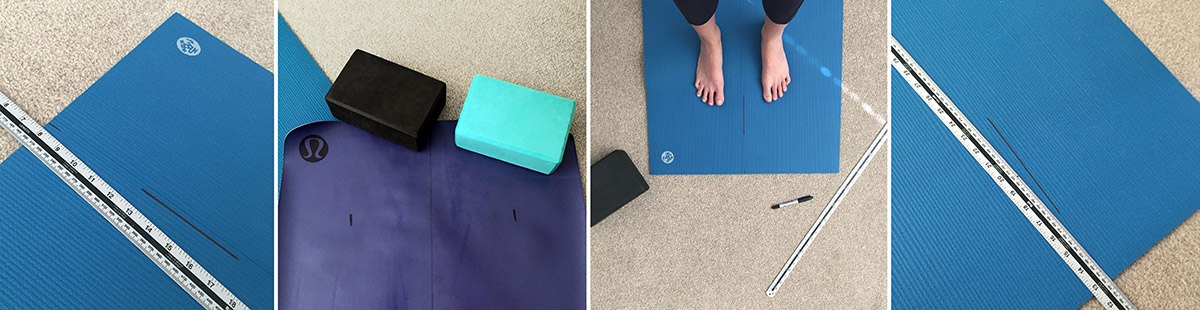
Shifting focus on how a pose feels rather than how it looks is the aim of the game. I love using props in my practice as I find they help to open up the body more and support safe alignment. I know many students who get put off using props feeling that they are only for beginners, but this is simply not true. Yoga blocks and straps help to create length and space in the body and allow us to access the correct muscles when verbal guides are not enough.
When I first started my yoga journey, phrases like ‘lift your knee caps’, ‘tuck your tailbone’ and ‘engage your core’ left me bewildered. I’m not really one of those people who is too proud to ask a question when I am stuck even if there is a risk I might look a bit stupid, so one day I just asked. I was lucky to have such a wonderful down-to-earth teacher who reassured me I wasn’t alone in my seemingly simple questions.
I was told to sit in Dandasana with my feet against the wall. I was then told to contract my quadriceps by drawing my thigh muscles up as if I was standing strong in Tadasana. From this simple exercise I could see my knee caps lift and realised it was all about my thigh muscles and I was getting all caught up in what my knees were doing and it was all about engaging my thighs. This is so important in yoga as it helps to protect the knee from hyperextension. Keeping this in mind, standing poses immediately become stronger and more solid and of course safer.
‘Tucking the tailbone’ can be quite misleading. Like our bodies, the position of the pelvis is also different from person to person. Whether the pelvis tilt is anterior, posterior or neutral, the cue to tuck the tailbone just won’t work for everyone. Instead, by drawing the hips towards one another, the belly in and up and the tailbone down the leg muscles strengthen and the lower back is protected. The pelvis feels balanced and the core is strengthened.
The core and understanding all the muscles attached to it requires a post in its own right, but for now I will attempt to put it in a way that is a little less puzzling. When we engage our core we want to support and stabilise the spine. When done correctly it feels like having something tight like a corset or a belt wrapped around your waist. Pull the muscle around your waist towards the midline to try and get that feeling. Lastly, you want to tighten the pelvic floor muscles up towards your navel. Imagine you are trying to stop yourself from going to the toilet. All our movements are initiated from an engaged core. It can be a weird feeling so a handy tip would be to try this when not exercising. While waiting for the kettle to boil or brushing your teeth, get your body used to this hugged in feeling and then when you get on the mat engaging your core will feel more natural.
There are also a number of other alignment cues you can incorporate into your practice, and while I don’t expect anyone to remember all of them having some idea of just a few of the principles will make your practice easier and far more effective. Your foundation will be stronger, you will become aligned with gravity, have more energy and use less effort to do poses that currently seem out of reach.
 During a class always think about your feet. We always hear teachers telling us to ground our feet but what that actually means is distribute your weight evenly into all four corners of the feet which are your inner and outer heel, your big toe mound and your pinky toe mound. To get a good feel for what we are aiming for here, stand in Tadasana. Lift all your toes, and then the area on the ball of your foot underneath the big toe feel that area press downwards and back towards your inner heel. Then do the same with the area underneath your pinky toes, pushing downwards and back towards your outer heels. Then allow the rest of the toes to come down to the floor. The point of this is to feel the arches lift and activate the legs. You will notice how much more grounded and stable you are. If you are not grounded, it is very hard to maintain a solid and spacious pose.
The same also applies when placing our hands. Fingers should be spread wide pointing forwards and the pads underneath our knuckles should press firmly into the mat as well as your fingertips. Do not collapse into the heels of your hands as this will put unnecessary strain on your wrists. You want to imagine you are creating a suction pad with your hands which will then help to support the weight you can put on your hands particularly in arm balancing poses.
We are always looking for space in our asanas. We never want to feel bunched up or like areas of our body are collapsing into other parts of our body. We want to be always lengthening from our spine (unless specifically instructed to do otherwise), softening our shoulders to avoid tension and keeping our necks long. As a teacher, the amount of times I see students collapsing in poses like Trikonasana just because they want to touch the floor, forgetting the point of the asana. Use your blocks, that’s what they are there for to help you find space in a pose.
Lastly, but by no means least focus on the breath. The breath is energetically nourishing the anatomical posture and therefore should be our primary focus. Aligning our breath with our movement allows us to move a little easier through the poses. Our minds become quiet which means our focus increases.
 When practising yoga, all the asanas should work for you in a good way and not cause any pain or discomfort. Make sure to inform your teacher of any injuries and remember a class is not a posture race. Use the verbal cues from your teacher as a guide to reach a deeper connection with a pose and don’t be afraid to use any props that are available to you. As soon as one stage of a pose becomes easy, understand when your body is ready to move on or go deeper, but take your time. Alignment may appear to be physically focused but the mind’s role is just as important. Alignment of the body, mind and spirit will mean your practice will become stronger, more steady and ultimately more relaxed.
Namaste
Vic xxo
The information provided on this website is for educational purposes only and in no way represents any form of medical or physical advice. By making use of this content, you are participating at your own risk. You should consult a doctor or physician before attempting any form of exercise or poses to ensure you do not injure yourself as a result. By making use of this website, you agree that Sida Yoga accepts no liability whatsoever for any damages or injuries howsoever caused.